Friday 24 October 2014

The best oats porridge you will ever eat!


I love oats porridge! I know it is not every ones cup of tea, but for me, it is the ultimate breakfast indulgence! Warm, creamy, healthy goodness in a bowl! I have been making this for Bump and I for breakfast just recently and he LOVES it!!! Makes my heart very happy :) So, if you want to make the the best tasting oats you have ever had....here is my recipe:

You will need:
1/2 cup oats (quick cooking or whole rolled oats - whole rolled will just take a little longer to cook) 
1 cup boiling water
2 T raisins or sultanas
1/2 cup milk
Medium sized apple grated (you can peel or not peel before grating)
1/4 tsp cinnamon 
Brown sugar or honey to taste (If you are going to feed this to your little one, PLEASE DO NOT ADD HONEY unless they are a year old!!! Although rare, honey can contain spores from the bacteria Clostridium botulinum which can make your baby very ill!!)
1 tsp peanut butter (a generously heaped teaspoon...or tablespoon....your call!) 

In a medium saucepan put the grated apple, oats, cinnamon and the raisins or sultanas. Pour over the boiling water. Add the milk and stir the mixture. Cook on a medium to high heat, stirring frequently until the oats are soft and creamy (the quick cooking oats took under 5 minutes cooking on gas).
Stir in the peanut butter and sugar or honey (if you are using) while the oats are still hot. 
Now you can sit down and enjoy! (Obviously allow to cool down before feeding to your little one - the raisins can stay hot for quite some time after being removed from the heat). 
This recipe should make enough for you and your little one. Hope you enjoy!

Keep smiling!
Jax


Tuesday 21 October 2014

Easy peasy girls skirt


KCWC day one:
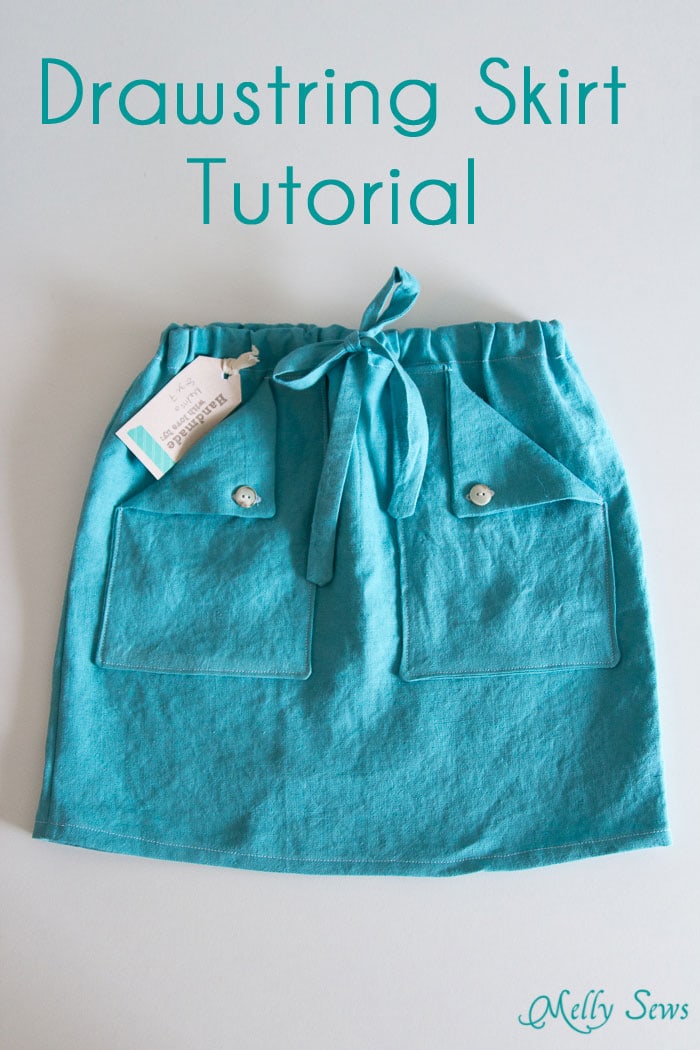
So I am super impressed with myself! I actually finished the little girls skirt I spoke about in this post! I am very good at starting sewing projects but not that good at finishing them all the time! Well to be fair to myself, it is usually only when something goes wrong that I don't finish...it will get scrunched up and thrown in the cupboard to be finished at a later date when I am less likely to take a pair of scissors to it in frustration! I was following a drawstring skirt tutorial from Melly Sews and got frustrated trying to make a buttonhole for the drawstring on my machine (for some reason it was stitching horribly!!) so instead of my usual stunt of throwing it in the cupboard I took a time out with a cup of rooibos tea and then decided to scrap the drawstring idea and just elasticate the whole skirt. I love how it turned out. It was a super easy (free!!!) pattern/tutorial to follow and the bonus is that the sizes go from a 2T to a 16 year old! Fabulous! I only wish I would get to see it on the little girl that I made it for. I made it to put into my Santa Shoebox for a little 2 year old girl called Lihle. It is such a wonderful, worthwhile cause and such fun to do! I will post about the project and the shoe boxes that we did as a family this year soon! But for now, time for some much needed sleep!

Keep smiling,
Jax

Signing up for Kids Clothes Week Challenge, October 2014


Okay so I must be crazy... I signed up for the Kids Clothes Week Challenge yesterday!! It is something I have been wanting to do for ages, but never get around to doing or don't find the guts to try. So this time I have just dived in! No excuses, (and no preparation either !!!) but I am going to have a go! This is probably going to be one of my busiest weeks as it is Bumps first birthday party on Saturday... So much to do!!! But hey, I am sure I can fit in an hour of sewing every day of the week in amongst the housework, cooking, looking after Bump and party prep!

So the first thing I desperately want need to sew is a little girls skirt for my Santa shoebox which I need to deliver on Thursday this week too (just to add to the chaos!)! But at least that can count towards my hour sewing even if it is not actually for my child right? This is the pattern I want to sew:

Sew an easy drawstring skirt in any size with this tutorial - Melly Sews


Is it not gorgeous? The pattern and tutorial is from Melly Sews. It looks pretty straight forward and it will give me an excuse to try my hand at french seams, another thing I have been wanting to try out.
Well wish me luck!! Time for me to get stitching!!!

Keep smiling!
Jax

Wednesday 23 July 2014

Appliqued onesies

So I know I have been quiet on the blogging front for a few weeks, but I have a good excuse... I have been appliqueing up a storm of onesies! Oh and getting very distracted by our Bump who has started crawling now and pulling himself up on things and generally just getting up to adorable mischief (he climbed into the dishwasher the other day!!!). He just melts my heart. Especially when he squeals with delight and charges on all fours after his furry brothers (cats), Jack and Zarkie. Good excuses for not blogging hey?

I love appliqueing onto onesies, there is something about them that just gets my creative juices flowing and calms my soul late into the evening while I blanket stitch around the designs and everyone else sleeps. I can feel myself start getting restless if I have not had a chance to do some stitching for a few days...maybe it is because I know I have orders waiting to be filled :)

So do you want to see what I have been up to? Here goes....


This hippo with the pink balloon tied to her tail is one of my favourites of a recent order I did. It appeals to my quirky side! And I love how the bright pink polka dot rhino onesie turned out! Who doesn't love a rhino? Or an elephant blowing hearts out of its trunk? ;)


The above two were also part of the same order. The poor owl looks a little startled but I love how she turned out just the same. The fabric that I used for the giraffe was originally ear-marked to make a little girls dress, but I could not resist pinching a few centimetres to use for this giraffe. I hope I will not regret it when I finally get around to sewing that dress!


These are more of my favourites. The bear was inspired by this quilt. I originally made Bump one like the blue one and loved it so much that I even made one in pink and made this one to sell (you can check out my Facebook page Handmade by Guppy). The lion was originally going to be for Bump, but I took so long to finish stitching it, that he had almost grown out of that particular size (8-10 kg), and so I decided to sell it. So now I owe my boy a lion onesie or shirt in a larger size! I really love how this lion turned out!


 These are a few more of my most recent appliqued onesies. I have already sold the turquoise rhino striped onesie. It was my absolute favourite!!! Well I hope you have enjoyed seeing what I have been up to lately. I will try to not take so long to post again :)

Keep smiling,
Jax


Sunday 6 July 2014

Make your own baby food: carrot purée


Bump really enjoys carrot purée (and thin slices of carrot if I am patient enough to slice them thinly and cook them until they are super soft) 
Making your own carrot purée for your baby is really easy! What I usually do, is I cook extra carrots when I am preparing them for dinner for my husband and I, then it does not feel like extra work.

So to make your own carrot purée:
You can cook as much as you like as it freezes well. I wash and peel the carrots and then slice fairly thinly (I aim for about half a centimetre in thickness or less, but rarely achieve perfection.., my knife skills are lacking). The reason that I want them thin, is they cook faster and are easier for Bump to eat should he want some whole. I rinse the carrot slices with boiling water and then steam until  tender. Steaming carrots can take some time if you steam using a colander over a pot of boiling water with a lid. However, steaming is well worth the wait! The carrots just taste so much better than when they are boiled. I put it down to steaming keeps all of the delicious goodness locked in! If you are lucky enough to have an electric steamer, please feel free to use it!

Once the carrots are tender, dish up what you are having for dinner and then purée the remaining with a blender for your Bub. You can thin the consistency out with boiled water, breast milk or formula. However, if you are freezing the purée, I would not recommend thinning it out until after defrosting.

Well, there you go! Could not be easier! Hope your little one enjoys!

Keep smiling,
Jax

Friday 27 June 2014

Make your own baby food: Pear and apple purée


Buying baby food puree's for every meal can end up costing a small fortune! Buying is super convenient, but spending  30-60 minutes once a week to prepare food is all you really need, to do it yourself. Making baby food yourself is really easy too! I make this apple and pear fruit purée for Bump which he loves!

Ingredients:
3 medium sized washed red apples
3 medium sized washed ripe pears
1 cinnamon stick or a generous pinch of ground cinnamon (optional)
Boiled, cooled water

Method:
  1. Peel and core the apples and pears. Cut into thin slices (You can roughly chop or cut the slices thicker, it just cooks quicker, the thinner the slices). 
  2. Place the sliced fruit in a colander and rinse with the boiled, cooled water. Place the fruit and the cinnamon (if you are using it) into a pan. Cover the bottom of the pan with water so the fruit is slightly submerged (it is better to use a smaller pan as you use less water).
  3. Simmer, covered for approximately 10 minutes until the apple and pear are soft. Drain the fruit, reserving the liquid. Purée the fruit with a blender. I use a stick blender. Use the reserved liquid to thin out the consistency of the puree if neccessary. Any remaining liquid can be diluted 1:1 with boiled, cooled water and given to your little one to drink provided they are over 7 months old.
  4. This freezes well. I freeze in cleaned, sterilised glass jars (used Purity bottles) or in ice cube trays.
FYI: Please note that it is often recommended that purees be passed through a mesh sieve to make the puree very smooth. I have never done this for Bump, as I do not own a sieve! He has been absolutely fine without sieving! In addition, his paediatrician recommended that he started rice cereal 4 months (very watery consistency) and then progressed to vegetable purées at 5 months. I was told to only introduce fruits and fruit juices (diluted 1:1 with water) at 7 months and meat and eggs also only from 7 months. I was also told to start off with very smooth purées and slowly increase the texture of the purées as this helps with speech development later. It is a good idea to feed the same food for four days in a row when first introducing it, to  ensure your little one has no allergies to the food. 

Well I hope you feel inspired to make your own baby food and that your little one enjoys this apple and pear purée

Keep smiling,
Jax

P.S. My apologies, I forgot to mention how much this recipe makes! I ended up with 4 servings of 125 ml and approximately another 60 ml or so.

Thursday 26 June 2014

Glitter and bead bottle toy


Hi there! Ever wished you could whizz up some quick, easy, budget-friendly  toys for your little one? Yes? Well then this is for you! I made Bump a bottle filled with water, beads, glitter and sequins. I based it on 'the ocean in a bottle' in this post.  My first attempt did not work out too well.... For some reason the oil made everything opaque and look dirty... It was a water-oil emulsion that didn't want to separate out again. Plus I had made it in a 500 ml plastic water bottle, which ended up being too heavy for Bump to hold with one hand once the water and beads were in. So, I attempted a second one. This is how I made it:

Materials:
Small empty plastic bottle (I used a travel-size mouthwash bottle), labels removed.

Glitter.

An assortment of different coloured and sized beads and sequins (if you are anything like me, you will have no problem finding these items in your vast craft stash!).

Food colouring (this is optional. I decided to not use food colouring after using too much in attempt number one).

If you have any small plastic toys like animals or army men, it might be fun to put those in too.

Boiled and cooled water, or water left over from sterilising bottles (my theory on using this water is that over time, you will not get stuff growing in your bottle! I hope I am right!)

Superglue to stick the bottle lid on.

Directions:
  1. Fill the bottle 3/4 full with water (you can do more or less depending on the effect you want).
  2. Add in your beads, glitter (and toys and food colouring if you are using them).
  3. If you want the bottle to be full, add more water. 
  4. Put the lid on and test the bottle out. Shake it up and see the beads etc. settle. You can make adjustments - add more or remove depending on your taste.
  5. If you are happy with how the bottle and its contents look, dry the inside of the lid well and the thread on the neck of the bottle. Put a few drops of superglue on the thread and screw the lid back on. Leave it to dry for as long as the superglue instructions recommend. You absolutely MUST glue the lid on! You do not want your little one opening a bottle filled with potential choking hazards! Even with the lid glued, I would still recommend that you do not leave your little one playing alone with the bottle.
A really awful photo (my apologies!!) of how the bottle turned out.


Bump loves his! It is great for distracting him when he is being strapped into his car seat (he hates that process!). He stares at it, shakes it about and then watches everything settle. I pop it in his nappy bag when I go out with him so that if he needs distracting, it is available! He also loves to chew the lid and shake the bottle as it makes noise. 

Bump playing with his bottle. I know I am biased as I am his mom, but isn't he just gorgeous? 

I would love to see how yours turn out!
Keep smiling,
Jax


Wednesday 25 June 2014

Ten tips to help you avoid breaking the bank when having a baby


Babies and children are THE most wonderful, awesome blessing ever! Unfortunately they do cost a lot!! Especially if you allow yourself to get swept up into the picture perfect storybook idea of having a baby that many shops create for you in their catalogues. Honestly, some of the items would be awesome to have, but possibly more for yourself than your baby! I have only been a mum (to a non-fur baby) for 8 months, so I am by no means an expert, but I wanted to share with you some of the tips I have discovered during these few months of being Bumps mom.

1. You do not need all the baby paraphernalia...like bottle warmers, wet wipes warmers, special nappy /diaper bins that come with their own set of expensive 'must haves'. They are all absolutely wonderful to have I am sure, but really not necessary when you are trying to do things on a budget. I maintained from day one, I would never warm Bump's bottle for him unless it came straight out of the fridge. My theory was, what happens if I, for whatever reason, were unable to warm his bottle...would all hell break lose? I wasn't willing to find out! So it was room temperature bottles made up just before use, and if I had stashed some in the fridge, a quick dip in a cup of boiling water was all it took to restore the milk to room temperature. I have the same argument for the wet wipes warmers - what on earth do you do when you are not at home? I really didn't see myself carting a wet wipes warmer with every time I went out with Bump! Honestly, my poor boy usually gets wet wipes straight out the bag, not even warmed in my hands (Shock! Horror!) and I promise he is fine! As for the special bins for the disposable nappies, I really do not think that they are necessary. I have a normal dustbin with a lid and lined with a plastic bag in the bathroom especially for nappies. I flush any solids down the toilet and then just wrap the nappy up tight and pop it in the bin. Provided the lid stays on, you wouldn't even know what was in there! As soon as the bin is filled, or gets too smelly, out it goes. Simple. As  for special bath stands and changing tables, I am sure they are very convenient, but they also cost a pop! We just got a baby bath (second hand from Pass it on Baby - check this place out) and a bath seat, which we simply placed in our bath. Bump used his baby bath until he was about 3 months old and then the bath started to get a bit cramped and so I upgraded him to our bath in his bath seat. We bought a tool table to use as a changing table so it would at least have a secondary use after Bump no longer needed it. Honestly though, except for the storage it provided, I sort of wish we had not bothered. Bump became very squirmy at changing time from about three months and I did not feel safe having him so high up in the sky, and so started changing him on the floor.  

Our tool table which was used as a changing table

2. Do not turn your nose up to preloved clothes and toys. If friends or family members offer you preloved items, accept and give them a huge hug. We were very blessed with clothes from my sister, sister-in-law and friends that had previously been worn by their children. Besides a few onesies which I bought, Bump was dressed exclusively in gifts or preloved clothes for the first 3 months of his life. In fact he is still wearing some preloved clothes and gifts! It saved us A LOT! We were also blessed with preloved toys from my sister and a baby gym, feeding pillow and Bumbo seat on loan from friends. 

3. If you can, cloth nappy, even if it is part time. Disposables are not cheap. I cloth diaper part time as I do not have enough cloth ones to do it full time and in addition, when the laundry pile gets a little overwhelming, the thought of having to somehow fit in a load or two of nappies just makes me want to run screaming for the hills and then I give in and use disposables. But it definitely does help! (I am planning on doing a post about cloth nappies if anyone is interested!)

4. When your little one starts eating solids, make your own baby food as much as possible. Commercially made baby food is expensive and I promise making your own is quite easy, plus it ensures you have control of what goes in to their food. While I do use premade stuff occasionally when I am behind on cooking or we are out for the whole day (my mom spoils Bump with Purity), I definitely prefer home-made food for Bump.

5. Don't buy too many clothes or nappies in one size - they grow faster than you think. I remember buying a few onesies for Bump when he was around 3 months old. I bought 3-6 month ones, thinking they would last a couple of months. Well, he must have had a growth spurt because after wearing them for about 3 weeks, they became rather snug! 

6. You really don't need those rockers/bouncers etc. to put your baby to sleep. Nice to have if you have the money, but not really practical if that is the only way your baby will go to sleep because if you are not home, you are screwed. 

7. Breast feed if you possibly can. I know that this is not an option for everyone and there is nothing wrong with that. I was an exclusively formula-fed baby and I would take huge offence to any one telling me that formula-fed babies have 'issues'. As long as your baby gets fed. that is all that matters! I breast feed Bump and have to top him up with formula as I have issues with supply at times. I wish I could exclusively breast feed but being able to breast feed a bit at least does help financially as the formula Bump was prescribed is expensive! Another area to save if you are breast feeding is to use reusable material breast pads, rather than disposable ones.

8. Use wet wipes sparingly. I was very good at only using wet wipes when I was out with Bump or if he had a messy nappy when he was younger. I used to use a facecloth and water with a drop of tea tree oil in it if he had a wet nappy. I have gotten lazy with doing this and am now having to buy more wet wipes than usual...I need to get back to being good!

9. Don't spend a fortune on cute clothes, rather put that money towards the big items like prams, car seats and cots. If you are going to be blessed with a baby shower (I hope you will!!) don't go buy bundles clothes and blankets etc.You will probably get more than enough as gifts and if you're not opposed to your Bub wearing second hand, you will more than likely have many friends or family members giving you clothes their babies have grown out of (point 2). While it is fun to dress your little one up in cute outfits, these do tend to cost a fair bit more. By all means have a few, but for when you are at home, onesies, leggings and babygrowers are cheaper and more practical. In addition, do not feel like you have to buy your babies clothes at high end shops and baby boutiques. I promise the clothes will look bright, shiny and new for about thirty seconds after you have put it on and then they will spit up or vomit on their outfit, or worse have a blowout and stain those clothes! (Horror!) When I have had to buy clothes for Bump, I am not embarrassed to say that I have shopped at PEP, Asmalls, and Jet and Ackermans. They have reasonably priced clothing that does actually last. We have been very blessed with Bump's two grannies who love to knit and buy clothes for him and we were very spoil with clothes at the baby shower and so we really haven't had to buy for him.

10. Your baby doesn't have to have the picture perfect nursery with all the decorations and bells and whistles. While it would have been wonderful to paint out a nursery and decorate it,with colour-co-ordinating accessories, we live in a one bedroomed cottage, so there was no pressure for me to do so as Bump didn't have his own room. I am actually quite grateful that the pressure to do so was removed. I think it would have only really been for me. Bump would have been none the wiser. Honestly all he cares about is that he gets fed, cuddled and that his mom and dad be silly with him and play with him...he couldn't care if that happened in a beautifully decorated nursery or in the room he shares with his mom and dad and two furry brothers (cats). Our room is bursting at the seams with Bump's stuff but also the most important thing...lots of love and that is all that matters!

One last thing I would like to suggest is don't be in a hurry to buy items. I know it is tempting to go crazy and buy everything, but I would just make sure I had the absolute essentials and basics and then wait until after your little one is born. You might find you cope fine without things you thought you needed to buy. And the gifts also keep coming after your baby is born! If your medical aid and hospital are anything like mine, you will also get lots of freebies from them, like baby toiletries, blankets and nappy bags.

Well, good luck with your precious new addition! I would love to hear of any money saving tips you have come across!

Keep smiling,
Jax

Saturday 21 June 2014

Are you brave enough to cut your own hair?

I just love HowtoHairGirl's blog! After finding the 'Shampree' post that I blogged about here and after trying it out, I discovered her post '5 DIY haircuts to try today'  and of course I just had to try! The photo of me in this post is actually about a week after cutting my hair like DIY haircut 3, described as 'Long layers with pretty face framing' on the blog. 


I could not get over how easy this was to do! And I love how it looks! It doesn't look as fabulous as my hairdresser would have gotten it, but there was something so satisfying about cutting my own hair! My hair unfortunately has a mind of it's own - it cannot decide if it wants to be straight and flat or wild and curly...It took me blow drying AND straightening to get my hair to look semi-decent. I love the layering around my face, but I think all the layering around the back may start to get a bit too labour-intensive for me, so now I am wishing I had found a way to just layer the front and keep the back straight and unlayered. I am thinking of trying DIY haircut 5, the mid-length layered bob next...What do you think? I will keep you posted if I get brave enough to try...

Hope you have a great day! Keep smiling,
Jax

Thursday 19 June 2014

What? Washing your hair without shampoo?


So you may think I am a little crazy if I told you that I no longer use shampoo to wash my hair...'What?' You gasp! Now before any of you start assuming that I do not wash my hair and start thinking 'Eeuww!' let me just clarify: I do wash my hair, just not with conventional shampoo. I have always been concerned about many of the ingredients added to the body and hair products that we use. I used to work as a biochemist and thus have a fair idea of what some of those chemicals are used for in the lab and I have looked up their material and safety data sheets (or MSDS's), and I have been left thinking 'what the hell am I putting this on my hair/skin for???' Now, I do not want to be sensationalistic. I will admit that the quantities some of these ingredients are used in the products are probably safe (one would hope so considering the products have supposedly been tested and approved before sale, but one can never underestimate the power of greed). But the thought that for some ingredients, the effects on developing embryo's are still unknown, the carcinogenic effects are unknown...was I really willing to take a chance? Plus, what these chemicals do to the environment once we have washed them down our drain pipes also did not sit well with me. So whenever possible I try to use earth and animal friendly options. I am by no means where I want to be with using earth-friendly products - but I do try. When I was still working full time before Bump's arrival, I frequently shopped at Faithful to Nature. If you are keen to give the 'green' living a go, check out this Cape Town based on line store. The products are fantastic! They are all animal-friendly, earth-friendly and therefore human-friendly! And their customer service has always been amazing! They are friendly and efficient and just a rocking bunch to deal with! Anyhow, I digress as usual! Back to the hair washing....I came across this blog post a few months ago and I was intrigued. And so I found myself washing my hair with bicarbonate of soda and rinsing with lemon juice!!!! HowtoHairGirl uses apple cider vinegar for rinsing, but I didn't have any and therefore improvised with lemon juice. I remember thinking 'This can't possibly work...' And yet it does! I was expecting my hair to feel like straw afterwards, but it felt smooth, silky and clean! It didn't really smell of anything so the next time I washed my hair I added a few drops of tea tree oil to the bicarbonate of soda solution and a few drops of lavender oil to the lemon juice solution. This is how my hair looks after washing it with this system (Please excuse the photo...I detest photos of myself....) Looks (and is) sparkling clean, would you not say?


The recipe I use is is written below, however I do suggest going over to HowtoHairGirl's blog as she gives recommendations of what quantities to try as a starting point if your hair is dry or greasy and has a wonderful Q and A section or you can buy a 'ShamPHree' kit.
 . 
For the 'shampoo' I used:
2 T Bicarbonate of soda
~2 drops of tea tree oil  (optional)
~250 ml warm water

For the 'conditioner' I used:
1 T lemon juice
2-3 drops lavender oil (optional)
~250 ml warm water

On the blog, HowtoHairGirl recommends making these solutions up in a squeeze bottle. I didn't have any squeeze bottles so I used some plastic containers. I put all the ingredients except the water, into the containers (one for the 'shampoo' and one for the 'conditioner'). I find if I add the water too long before use, the solution just feels too cold pouring onto my head which is just unpleasant! I brush my hair to untangle any knots and wet my hair. I add roughly 250 ml of warm water to the 'shampoo' container and shake it up to dissolve the bicarb as best I can. Then I pour it over my head concentrating on the roots of my hair. I massage it in very briefly (like 10 seconds or so) and brush my hair again (this gives the brush a good clean!). Then I rinse with water. And I do the same for the 'conditioner' except that I try to pour it predominantly over the tips of my hair (avoiding the roots as much as possible) and I do not brush my hair again. I rinse with water straight away. (I don't leave any of the solutions in as she recommends...too lazy!). Voila! Clean hair!

I did not experience any 'gunky' feeling on my hair, as experienced by some of the readers on her blog, but she does recommend sticking it out for a few more weeks as this feeling is probably just all the build up of product working its way down the hair and your hairs natural oils balancing themselves. It only lasts for a short while! I think the reason I did not experience this 'gunky' feeling is because before washing my hair this way, I used to use Earthsap Lavender and Sugar Beet shampoo and conditioner which are totally natural and plant based, or I used the Trevarno Rosemary soap which is also all natural and even better, great for travelling as you can use it for hair and body! 2-in-1! Bonus! So my theory is that my hair oils were already balanced and I had no product build up.

So are you going to have a go at washing your hair this way for a few weeks? I would love to hear how you find it! 

Keep smiling! 
Jax

P.S. I am not sure what the done thing is, but I thought I should just clarify that I get no money or perks for my discussions about Faithful to Nature or any of the products - I am doing it becasue I think they rock and more people should hear about them!

Saturday 7 June 2014

Copy Cat Skebanga's Pizza


Whenever we go on holiday to the beautiful Cape, we always try to find this wonderful little gem of a pub called Skebangas. You will find it located upstairs from The Red Herring restaurant in Noordhoek. Skebangas has the most charming, warm and friendly ‘locals’ feel to it, stunning views, great food and beer, and there is usually at least one dog and/or cat sunning themselves out on the deck, which makes the crazy cat lady in me happy! The pub was actually named after one of the very first locals in the pub, a whiskey drinking Jack Russell dog, who spent most of his time there. 

When we were last there, I ordered a delicious pizza called Skebangas pizza. It was light, tasty and more-ish! I just had to have this pizza more often, but living over a thousand kilometres away in KwaZulu Natal, I could not just dash over whenever I felt like this delicious pizza, so my copy cat version was born. I think it is too good not to share....I am hoping you think so too and that I don't have super weird taste buds or something! So here goes…

Ingredients:
Wholewheat pita bread (I had a pack of 6 – I only used 3 and popped the rest in the freezer for the next batch!)

Olive oil to brush the pitas with

Garlic cloves, 2-3 (according to your taste)

Baby spinach (I had a 500 g bag and used what was left to make a salad to eat with the pizzas)

A jar of whole peppadews, mild ones (you will have lots left over – pop them in the fridge for the next time you feel like this pizza)

Feta cheese (I used  low fat, but feel free to use the yummy goodness of full fat feta or better still... I wonder how delicious buffalo mozzarella might be instead….or as well? Please let me know how it turns out if you give it a try!)

Method:
1.   Warm the pita breads briefly in the microwave/oven according to the packet instructions. Halve the pita breads horizontally, so that you end up with 6 pita ‘pizza’ bases. NOTE: from here it is best to assemble the pita pizzas on the oven wire rack that you are going to grill them on….I did not do this (as you can see in the photos) and trying to put them on after all the delicious ingredients are piled on gets a bit messy, so trust me…assemble them on the rack you are going to put in the oven - you'll thank me later.


2.   Brush the pita halves with olive oil. Chop the garlic finely and sprinkle over the pitas.
3.  Wash the baby spinach leaves and arrange them on the pita halves. My ‘baby’ spinach leaves were not so ‘baby’ so I tore them into smaller pieces.


4.  Roughly chop the peppadews and sprinkle them over the baby spinach. Even the mild ones can be a little hot, so add these according to your taste. I love the flavour of peppadews and I am trying to train my taste buds to eat hotter food, so I went to town with these spicy little numbers!


5.   Now to add the feta (and/or the buffalo mozzarella if you’re keen to try it). I just broke the feta up into pieces and scattered it over the pitas. Does that not look good to eat already?


6.  Place the pita pizzas onto an oven proof rack (if you haven’t already!) and grill in the oven until the feta has melted slightly and the spinach has wilted.


7.    And you're done! Time to enjoy!


Well, I hope you enjoy making these and of course eating them, as much as I did! I would love to hear how yours turned out. And if you ever get the opportunity to visit Skebangas and Noordhoek, don't hesitate! Both are gems in my book. The beach is like heaven on earth, would you not agree?


Keep smiling!

Jax


Friday 6 June 2014

Bandanna Bib


So my little guy (isn't he gorgeous?) has been drooling for months now. With all his drooling and eating solid food, I am forever running out of bibs. Which is what led me to try making one of these wonderful bandanna bibs that I saw over at the Purl Bee. It is a free (Yippee!) tutorial that is really easy to follow, so there was no excuse to not give one of these cute bibs a try ;)


I used a lightweight denim for the top layer and some blue ladybug track suiting for the lining (Yes, I know ladybugs are not exactly typical 'boy' print, but they are blue!). I found both in my stash of scraps and so my apologies, but I have no idea what the brands of fabric are - they have been in my stash for probably 15 years!! (I worked for 14 years (if I remember correctly) at my (now) mom-in-laws haberdashery shop whilst I was studying and I acquired quite a collection of fabric.... What sane person wouldn't, being surrounded by gorgeous fabric every time they were at work? I honestly used to work to just buy fabric in the shop ;) And of course for the great customers who loved doing exactly what I liked doing - Sewing and having a fat chat!)
My fabric choices for this bib were not ideal from a practical point. I think they look amazing together and they feel amazing, and definitely keep Bumps chest dry from drool, but unfortunately they make the bib quite thick and stiff, so it kept riding up over the bottom of his chin The next one I make, I will use 100% cotton for both layers and see how that works. I’ll let you know how it goes! Hopefully he will still look as cool and cute as he does in this one! I am not at all biased hey?


I would love to see how your bandanna bibs turn out if you stitch any up. I think they would make really quick and stunning baby shower gifts!

Keep smiling,
Jax